The Mobile File Repository is mainly used to store the data for a software installation by a Client Command on a data carrier. This data carrier can then be sent to a (field service) employee if, for example, the latter has only a small bandwidth connection to the corporate network or if the connection has been established via an expensive wirelessWAN or dial-up connection. This makes it possible to save a lot of time and possibly money especially with larger Client Commands.
Note: |
As of ACMP version 3.8, the concept of distributed file repositories should be used. The Mobile File Repository should only be used in exceptional cases. |
If no disk is available and if the client is a mobile terminal, the installation data will be loaded with BITS from a specified server share. However, if the client is not a mobile terminal, the data is loaded from a file repository.
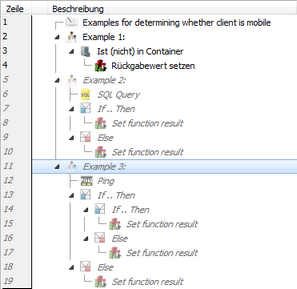
To identify a client as a mobile terminal, enter a function (see Manage Functions) which returns the result TRUE or FALSE. This function could query, e.g. via a condition, if the current client is located in the 'Mobile' container.
The ClientIsMobile function
|
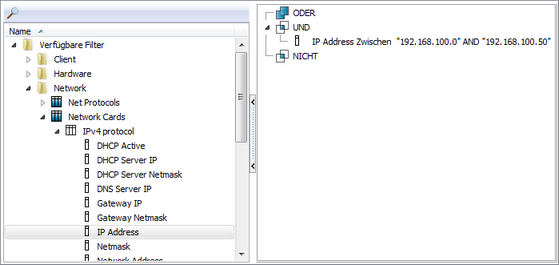
Dynamic linking of clients to a container |
For this purpose you would also create the container 'Mobile' (see Container), which dynamically captures, e.g. all clients whose IP-address falls within a certain range (e.g. VPN inputs).
Another option is to query the network status of a client directly from the database. The required SQL query is: SELECT NetworkStatus FROM CLT_CLIENTS WHERE ClientID = '%ACMPCLIENTID%'
If the returned value is 1, it is a mobile client and the function can return TRUE.
It is also possible to determine the current connection quality of the client to the server using a ping and then decide on the basis of the response time if the client is to be treated as a mobile client.
The Package Wizard
When a Mobile File Repository is use, the Package Wizard functions more or less as described in Create a Package. Besides the creation of a Mobile File Repository (see following section), specify a UNC path to a release containing the installation data. You can specify the authentication data as well.
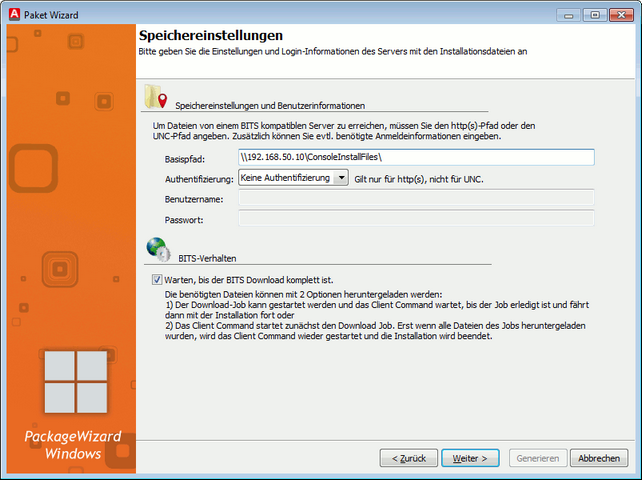
If the option Wait until the BITS download has been completed is enabled, the download is started and the Client Command waits until all files have been downloaded and subsequently starts the installation. All other Client Commands are blocked during this time. If this option is not enabled, the download starts and the Client Command ends. Once the download is complete, the Client Command is automatically resumed and the installation continues. Other Client Commands are not blocked during the download.
Immediately after entering the UNC release, you are required to enter a function. This function serves to determine if the corresponding client is considered as a mobile terminal.
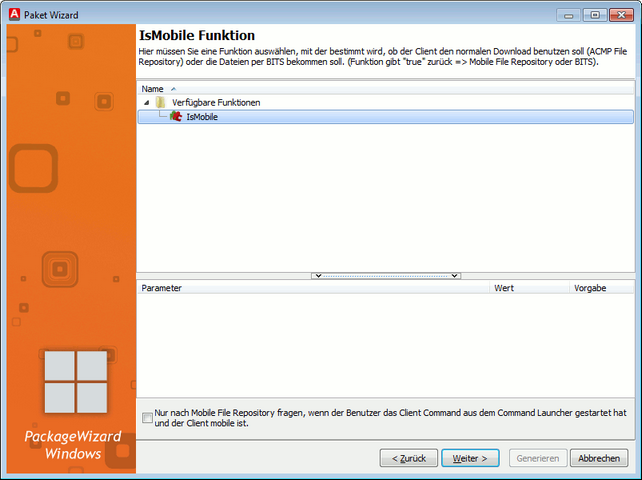
The option at the bottom of the dialog margin serves to ensure that a Mobile File Repository is only used if the user of a mobile terminal starts the Client Command generated out of this project by means of CommandLauncher. If the Client Command ist started, e.g., by an administrator, the installation files are downloaded automatically with BITS, which may give rise to exorbitant costs (e.g. in the case of UMTS).
Create Mobile File Repository data carrier
There is currently no automatic procedure to create a Mobile File Repository disk. Hence, it must still be created manually. However, you do not need to collect all mobile file repositories on a single data carrier, you can create them on any number of data carriers. The creation of such a data carrier is described below:
| 1. | For each Client Command which was created with the Package Wizard with the Mobile File Repository option, you can provide the installation data on a disk. To this end, create an unencrypted zip archive for each Client Command. The zip archive serves to save the data which are also located in the file repository of the corresponding Client Command. The zip archive is named after the Client Command-ID. The data of the file repository can be accessed with the Client Command editor by opening a Client Command with the Client Command editor and then opening the file repository stored there. Alternatively, you will find the subfolder File Repository\projects directly in the ACMP installation directory. There, the file repository files of each Client Command are located in a folder which is named after the ClientCommand-ID. The data of a Client Command version are contained in the corresponding subfolder. While the data of all versions are available on the server, only the current data will be kept in the file repositories. |
| 2. | In order for the data to be later accepted on the disk by the installing Client Command, an index file must be created as well. To this end, create the file MobileFileRepo.ini. In this file, the following data must be stored for each zip archive: |
[ClientCommand-ID]
Version=No.
Description=description
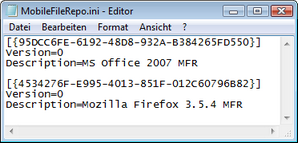
The data can be inferred from the properties of the respective Client Commands.
| 3. | The data should now be available as in the following screenshot: |
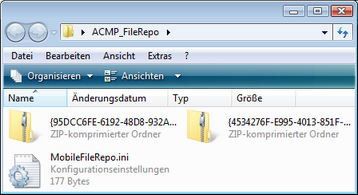
Now write the data by preference on a CD/DVD, which are then named ACMP_FileRepo. This makes it easier for the Client Command to find its installation files. The final data carriers can now be distributed to employees, which means that Client Commands can draw their installation files from the data carrier instead of having to load them from the network. Note, however, that an increase of the version number of a Client Command on the ACMP Console has the consequence that the data on a CD cannot be used any longer, since the file MobileFileRepo.ini contains the wrong version number. As a workaround, the data from the CD can be copied locally, and the version number can be adjusted in the MobileFileRepo.ini file.
Running the Client Command
After the completion of the Package Wizard, the Client Command is ready for execution. If this Client Command is allowed by means of the properties for Allow interactive use, an employee can start the installation as well as any repairs or deinstallation manually. Otherwise, the configuration can be triggered only by the administrator.
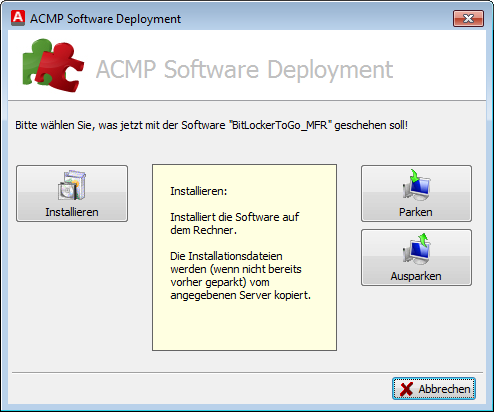
After the Client Command was started, a small dialog box opens. With this dialog you can specify whether the software is to be installed, repaired or uninstalled. If you have specified a setup file in the Package Wizard, you have the option to repair or uninstall only if you have provided the information for the repair or uninstall file as well.
You can then select the source for the data. With the button Search you can select the MobileFileRepo.ini file from a data carrier. Click on the Download button, the data are loaded from the file repository on the server or from the indicated UNC release, although this depends on the question if the client is treated as a mobile terminal or not.
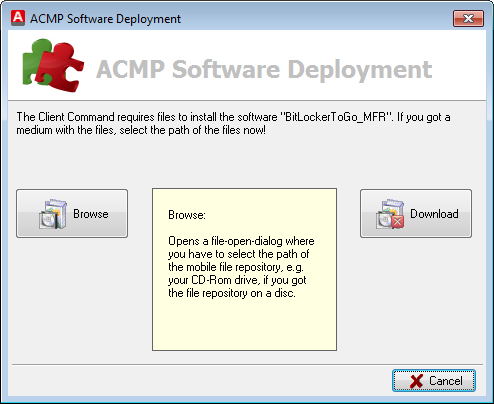
After selecting the data source, the normal installation routine is executed with the corresponding commands that were specified during creation of the Client Command with the Package Wizard.
Last change on 10.03.2014
