Create a container 
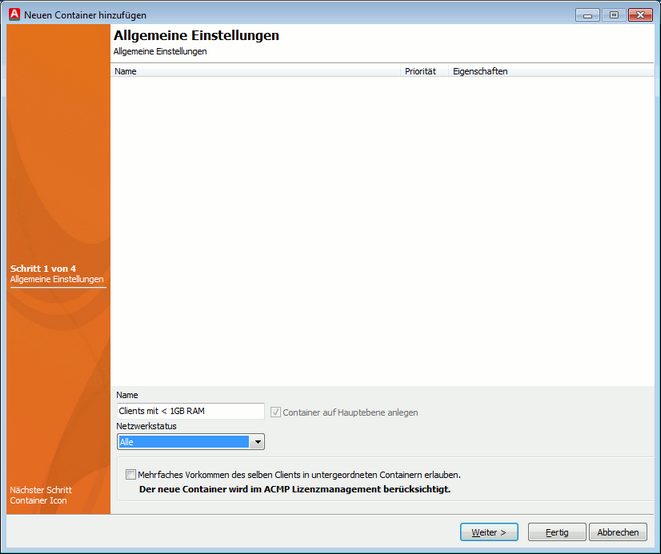
To create a container, run the appropriate Wizard with the Add Container icon. This Wizard will capture all necessary data and create the container accordingly.
Firstly, enter a name for the container. The container can be created directly on the Main Level with the adjacent checkbox. Alternatively, you can select an existing folder from the upper box in which the new folder will be created as a subfolder. You can also select the network status.
The netzwork status indicates if the clients therein are available mobile or in the LAN, or if the clients are available Always or No. In section Change the Network Status you can learn more.
The last checkbox Allow multiple occurrence of the same client in subordinate containers indicates if a client can appear more than once in the same folder and subfolders. This relates to License Management. Because if a client appears more than once, the licenses would also have to be counted more than once. This option serves to prevent precisely this result.
In addition, the scope of application of the container determines whether multiple occurrences of clients should be allowed. If you map the location structure of your company, multiple occurrences must be prevented, since a client cannot be simultaneously in two different locations. However, if you create several containers for software maintenance, multiple occurrences should be allowed, since a client can be associated with several different software programs.
Note |
This option cannot be changed subsequently. |

Step 1: General
In the second step, you now select an icon. Alternatively, you can edit, delete or add the existing icons with the corresponding buttons.
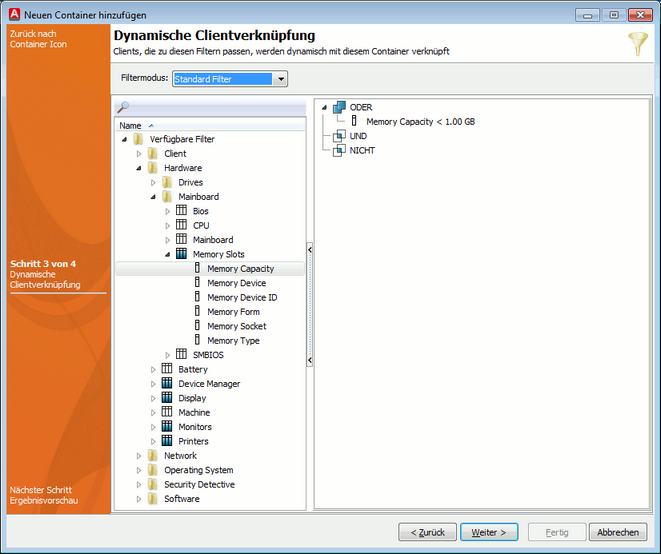
In the last step, you can create rules for creating dynamic links to clients. However, if you need a static container, no settings are to be made at this point. For further information required to set up the filters, consult section Set Up Filters. In addition, as of ACMP 4.0, you are the option to create a specific SQL query for the dynamic linking of clients with the container. To this end, change the filter mode from Bool tree to Extended Filter. For more information on using the Wizard, see the section Create Queries.

Step 3: Dynamic client link
Now click on Finished, and the container will be generated. Other settings can be adjusted via the detailed view (see Detailed View), in which case static clients can be added at the same time (see Using Clients).
Edit Containers 
To edit a container, select it and click on the Edit Containers icon. Then the same dialog opens as during the creation of a container, except that the existing values are already entered and can be changed as desired.
To move a container, e.g., to another container, select it. You can then move it anywhere with drag & drop. This cannot be changed via the Wizard at a later stage.
However, one setting cannot be changed: he setting of the checkbox Allow multiple occurrence of the same client in the same container. Therefore, consider this option very carefully when creating a folder.
Delete Container 
To delete a container, select it and click on the Deletec Container icon. Then confirm the confirmation prompt, and the container, including its subcontainers, are deleted.
Last change on 10.03.2014