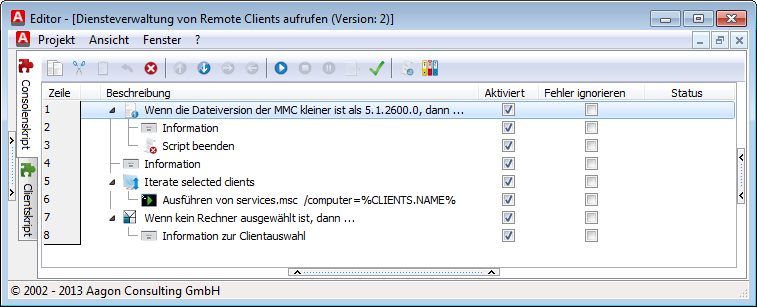
This area of the CommandEditor is the main section. Here the client and console script are assembled and individual commands are managed and tested.
Vertical tabs
On the left side there are two vertical tabs, with which you can change between the console script and the client script. The current tab is marked with a golden bar.
Quick access toolbar
At the top there is a quick access toolbar for controlling and configuring the current script or the Client Command:
|
Copy Copies the selected commands. |
|
Cut Deletes the selected commands and stores them to the clipboard. |
|
Paste Pastes the current contents of the clipboard below the selected command. |
|
Undo Reverses the last action. |
|
Delete Deletes the selected command. |
|
Move up Moves the selected commands one step up in the script. |
|
Move down Moves the highlighted commands one step down in the script. |
|
Right arrow Moves the selected commands one step to the right in the script. |
|
Left arrow Moves the selected commands one step to the left in the script. |
|
Execute Runs the current Client Command. |
|
Stop Stops the execution of the current Client Command. |
|
Pause Pauses the execution of the current Client Command. |
|
Step Executes the next individual command. |
|
Syntax checking Verifies the script syntax for logical errors. |
|
Show Changes Lists all implemented changes with time and author. |
|
Create project summary Generates a summary of the current Client Command. |
Supplement to: Show changes
This icon will open a window listing all changes and events for the current Client Command in chronologically. In the top bar you can sort the list according to individual users as well as according to a certain period.
Supplement to: Create project summary
This icon opens a dialog which allows you to generate a summary of the current Client Command by specifying the file in which the summary is to be saved. The file can be generated as a .txt or a .html file. Select the appropriate type from the options. Furthermore, four other options are available:
Integrate header Integrate project variables Integrate global variables Show document after generating |
Generates and integrates a header. It lists all project variables. Lists the global variables. Opens the document after generating. |
Object Inspector
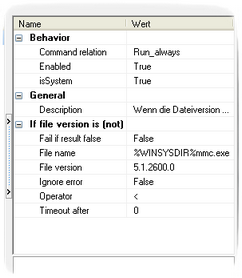
The Object Inspector is located in the right margin of the script area and serves to list the properties of the selected commands in the script.
In doing so, the properties are listed as pairs of variates with the name of the property andd the associated value, and the individual properties are divided into categories. |
|
Script
In this area the client script as well as the console script is generated. The individual commands from the CommandList are inserted and configured with drag & drop. Afterwards, the commands can be arranged and managed in an appropriate order with the above-mentioned operators (quick access toolbar, Object Inspector, tabs) as well as the five columns of this section:

Client Command script in the editor
In the Line column, a particular command can be found quickly, as a continuous index is displayed. Directly next to it, you will find the related command with the command-specific icon as well as a description. Several commands are arranged in a tree structure, as familiar from the Explorer.
In the same way, a so-called breakpoint can be set in this column with a click. A breakpoint servest to stop a Client Command running (for testing purposes) and to run through the rest of the Client Command step-by-step. In this way, errors can be detected relatively easily (debugging).
A checkmark in the Enabled column indicates whether a command will be executed or skipped. In this way it is possible to disable, e.g. an extension of the script until it was tested. All subordinate commands are also disabled, but still retain the checkmark. They are only grayed out and italicized.
With the Ignore errors column, you can still run the script even though a command was not correctly executed and caused an error. Simply checkmark the box of the command, of which the error should be ignored.
The Status column indicates in the case of a syntax check and during the execution of the script (e.g., for test purposes) if the command was correctly executed or if errors were caused.
The proper procedure to create a Client Command is illustrated by means of a simple example in section Create a Client Command.
Last change on 10.03.2014


