To strengthen the basis for further action, the tools are briefly explained below:
| ▪ | Add rectangle object |
With this tool, you can insert text elements as well as variables and small scripts in the report by placing the object at the desired location of the workspace. A dialog then opens. This dialog is divided by default into two sections. In the upper section you can enter plain text or a variable. Text is simply added, while variables have to enclosed in square brackets.
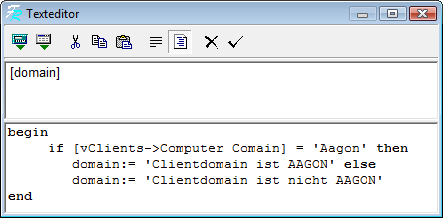
In the figure, the variable 'domain' is shown in the top section. Accordingly, the value of the variable later appears in the object. Some variables are provided automatically based on the query selected at the outset. The variable 'domain', however, is defined in the lower part and is thus also available.
In the bottom section, a script has been inserted with Delphi. This script will check if there is a client in the AAGON domain. The vClients->Computer Domain variable is used. This variable is defined by the selected query. If the domain of a client is now equal to AAGON, the domain variable is delivered with a corresponding text. In the same way, a corresponding text will be issued if the domain is not equal to AAGON.
Variables that are automatically deployed via the selected query can be integrated via the left icon of the Insert rectangle object dialog (1). Then the expression editor (3) opens. With this editor, you can integrate variables and functions. The DB fields are available only in advanced queries. With the Variables button, a dialog can be called with all available variables (3).
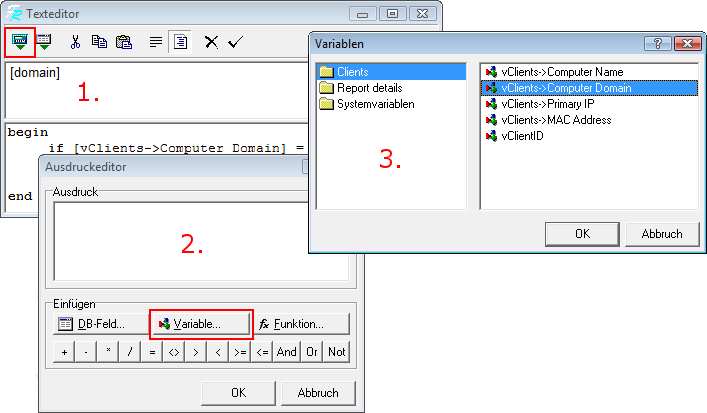
The variables are grouped in categories. By default, the categories Report details and System variables are available. Since the selected query is based on the client data, the category Clients is also available. These categories contain variables to allow access to the various values of the query.
The content of the rectangle object is accepted via the right icon in the top bar.
| ▪ | Insert area |
With this tool you can specify various areas of the report. Among other things, you can define a page header or footer as well as an area for sub-queries. Moreover, it is possible to group data according to certain attributes with this tool.
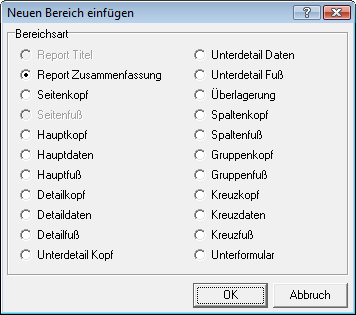
Take the Insert area tool and paste it to the desired location. A dialog to define the purpose of the area then opens. The main areas are described in more detail in a later chapter.
| ▪ | Insert image |
With this tool, you can insert an image in the report. A simple dialog opens after you have place the tool in the workspace. With this dialog you can load an image from the hard drive. The image is inserted in the report and can be positioned and resized at will.
| ▪ | Insert subreport |
With this tool, you can embed another report in the current report To do this, position the tool at the desired place in the workspace. It opens a new page on the workspace where another report can be generated. This report will then be inserted in the main report at the previously indicated location.
| ▪ | Paint line |
With this tool you can insert horizontal and vertical lines in your report. In this way you can separate different datasets from each other. Drag the tool to any section of the workspace while holding down the mouse button.
| ▪ | Insert figure |
With this tool you can incorporate pre-defined geometric figures in the report by placing the tool at any place on the workspace. By default, a rectangle is created. With the Object Inspector, you can change the shape into a rounded rectangle, ellipse, a triangle or a diagonal line. The Object Inspector is described later in this chapter.
| ▪ | Insert RTF object |
With this tool you can add formatted text in your report. Place the tool at an suitable area of the workspace. It opens a window similar to WordPad used by Windows. Here you can format text at will and then insert it subsequently.
| ▪ | Embed barcode |
Wiht this tool you can insert a barcode in the report. After placing the tool on the workspace, the barcode editor opens. You can enter a fixed value or a variable as source for the code. For the type of barcode you can choose between 23 different types.
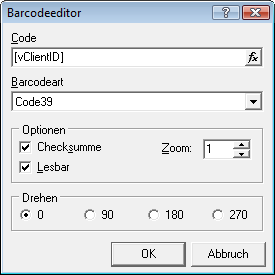
As options you can specify if a checksum should be appended to the code, and if the source should be displayed in plain text as well. It is also possible to define a zoom level. In addition, the barcode can be rotated in 90° intervals.
| ▪ | Insert checkbox |
With this tool you can add simple checkboxes in the report.
| ▪ | Insert chart |
With this tool you can insert a chart in your report. Move the tool to any position to open a Properties window. You can now select the chart type and several options.
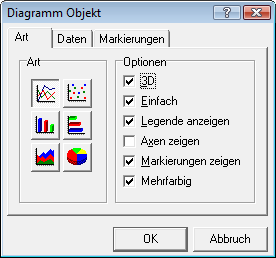
Specify the data source for the chart in the Data tab. You can specify information to label the chart in the Markings tab. A more detailed explanation is provided in a later chapter.
Last change on 10.03.2014