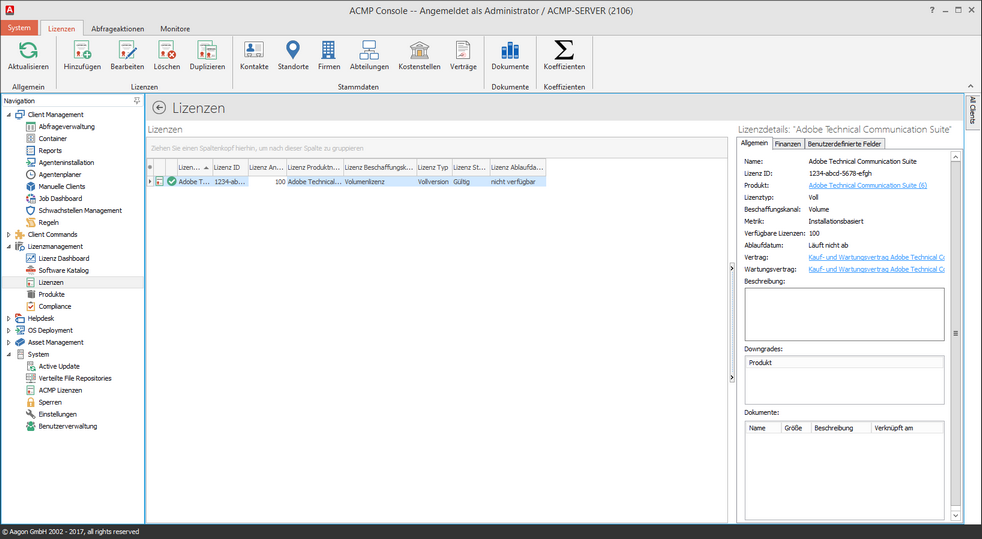
The sector Licenses is divided into 2 sections. In the left section all already created licenses are displayed while the details to actual selected licenses are displayed in the right. In this view, the details may not be customized.

Übersicht Lizenzen
The ribbon bar shows you all the functions that you can use in connection to the license products.
|
Update Update the current page |
|
Add License A wizard will open with which you can you can create a new license |
|
Edit License A wizard will open with which you can edit your selected license. |
|
Delete License A wizard will open with which you can delete the selected license. |
|
Duplicate License A wizard will open with which you can duplicate the selected license. |
In addition, you have access to the Master Data, Document Management and the License Coefficients via the Overview.
Add License
First enter the name of the license. If it is pertaining to an Unlimited License, activate the corresponding checkbox. Otherwise, enter the number and the License ID.
The following drop-down-field enables you to establish a Procurement Channel. Here entries of the Volume, OEM and Retail Product are not possible. After you have entered an optional description, enter the license type. If you have chosen “Full “as the license type, which generally allows you to run and install software with this license. An additional license is not necessary.
If you select the "Upgrade" License type, you can run and install a newer version of a software coming from an older version, or a later edition of a lower edition. This license type requires a Full Licence in order to be licensed correctly. You can select but not create the associated licenses directly in this wizard.
On the following page, first select the Metric type and enter the associated product. Only when the license has been assigned to the right product, will the displayed results in the Compliance Overview be accurate.
Tip: |
Make sure that the Metric type of the Product is identical to that of the license! |
Enter the enhanced Metric characteristics for the calculation method in virtual environments.
Therefore, availing the following options:
Per Physical Device |
With this option you need a valid license for the first installation. All additional installations on the same device (physical and virtual) are licensed sufficiently with the licence from the first installation. In addition, you can limit the licensed virtual installations. For this activate the checkbox and enter the number. |
||
Per Operating Systems Environment (OSE) |
For this option; for every installation that is located in another operating system, a license is acquired.
If you install an application in an Operating Systems Environment multiply, a valid license is necessary. |
||
Per Installation |
For this option, a valid licence is must be acquired for all installations (virtual and physical). |
In addition, you can determine whether this license is granted secondary usage of rights. In this case activate the corresponding checkbox and enter how many installations are considered as secondary usage of rights.
Tip: |
Please note that it is important for you to allocate a main user for the secondary usage of rights. This information portrays the connection between installations. Hence, it can be determined whether secondary usage of rights is required for the software installation. |
Finally, enter whether a License Coefficient should be applied to this license.
After you have carried out all necessary entries, click Next; in order to add additional licensing rights.
Now select the products on the down grade rights from which this license exists. Provided that the product does not already exist, you may add it.
If you have the right to a new version with your license, you can activate the checkbox, register and specify the deadline for notifications about new versions.
In license contracts, the reallocation of a license is usually limited. Hence, after de-installation of a particular software, it is not possible to reinstall that same software with the same license immediately. You can also enter the contractually agreed commitment period, if one has been agreed upon. For this, activate the checkbox and enter the period (in days).
Finally, enter the license expiry date. In addition, you can configure a warning that will inform you before the license expiries. After you have made all entries pertaining the license agreements, click Next and enter you license`s financial data. Provided you have created a user-defined field for the licenses, fill it on the next page. On the last page of the dialogue you can link your document to your licenses.
Tip: |
In order for the licenses to be invoiced, you need to carry out a Compliance Recalculation. |
Last change on 22.02.2018