With this command you can set up a new user locally on a client EUnder the Hood tab the user (login) name and the full name and a description. You can then assign a password that must be entered twice.
In the Attributes field password information can be specified in more detail: - User must change password at next logon - User can not change password - The password never expires - Account is locked |
With this command you can rename a local user (login name). You enter under the Details tab in the old username and the new username. The old user name, you can specify by clicking on the button next to the input field and select a user. However, only the local users are displayed. |
With this command you can assign a local user a new password. You enter under the Details tab to the user as well as the new password. The password must be entered twice. The old user name, you can specify by clicking on the button next to the input field and select a user. Here, however, only the local users are displayed. |
With this command you can change the Konto-/Passwortattribute a local user. You enter under the Details tab to the user by clicking on the button next to the input field and select a user. However, only the local users are displayed, additional users can be specified manually. The following attributes can now be reset: - User can not change password - Password never expires - Account is locked |
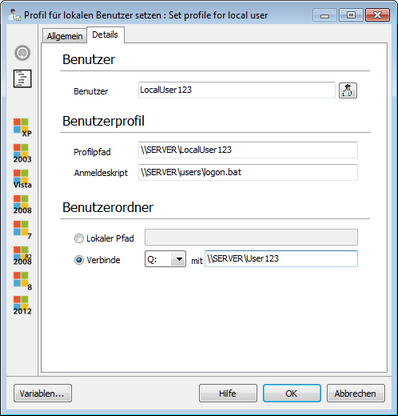
With this command you can create a user profile on a client by entering the user (login name) in the Details tab. You can do it manually or using the button next to the input field. Click on the button all local users are listed.
In the user profile, you specify the profile path, as well as a possible logon script. As a user directory, you can specify either a local path or a network path (Connect) integrated as a drive. The network path you specify the drive as well as the appropriate path. Paths are hereby specified as absolute paths.
|
With this command you can delete a local user. To do this, under the Details tab in the task name. This can be done manually or by using the button next to the input field. |
With this command you can set up a group of users on a client. To do this, under the Details tab the group name and a description of the group. |
With this command you can delete a local user group. You enter under the Details tab in the group name. This can be done manually or by using the button next to the input field. |
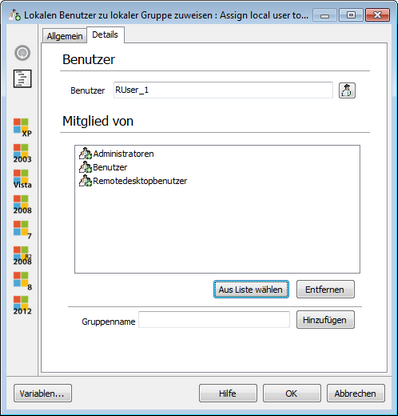
With this command you can integrate a user in a local group. To do this, select the Details tab under the appropriate user by entering it manually or use the button next to the input field. Now you can use the button from list, select a dialog call, via which you can assign the user to multiple groups.
In the dialog that opens, local groups are listed on the left side of the dialog. Select a group and click the arrow button in the middle of the dialog to move the group to the right side of the dialog. Click on the OK button, all groups assigned to the user on the right of the dialog.
Alternatively, you can also create a new group by clicking on this main dialog Enter directly under the group name and click Add.
|
With this command you can assign multiple users to a group. To do this, select the Details tab under the first group, entering them manually or using the adjacent button. Now you can use the button from list, select a dialog call, via which you can assign the user to multiple groups.
In the dialog that opens, local groups are listed on the left side of the dialog. Select a user and click the arrow button in the middle of the dialog, to move it to the right side of the dialog. Click on the OK button, all users are assigned to the right of the dialog of the selected group. Alternatively, you can also enter a user directly, by entering it in the main dialogue among member and click Add. |
With this command you can remove multiple users from a group. To do this, select the Details tab under the first group, entering them manually or using the adjacent button. Now you can use the button from list, select a dialog call, via which you can assign the user to multiple groups.
In the dialog that opens, local groups are listed on the left side of the dialog. Select a user and click the arrow button in the middle of the dialog, to move it to the right side of the dialog. Click on the OK button, all users are assigned to the right of the dialog of the selected group. You can also enter a user directly, by entering the user in the main dialogue as a member and clicking on Add. Optionally, you can also generate an error if the user does not exist. In this case, the client command is canceled. |
With this command you can allow a user or group of certain rights. For this purpose they choose under the Details tab the corresponding right from the drop - down list. You can then use a user / group to specify on what / which is to be awarded the right. These specifications can be done manually or through the adjacent button.
When you click the button, a dialog which lists all users and groups opens. Thereby these foregoing the icon can be distinguished from each other. A single user has an icon with an abstracted person while a group has an icon with three abstracted people. Select the group / user and click Add. About the OK button, the selection is finally adopted.
|
With this command you can allow a user or group of certain rights. For this purpose they choose under the Details tab the corresponding right from the drop - down list. You can then use a user / group to specify which / that is to be deprived of the right. These specifications can be done manually or through the adjacent button.
When you click the button, a dialog which lists all users and groups opens. Thereby these foregoing the icon can be distinguished from each other. A single user has an icon with an abstracted person while a group has an icon with three abstracted people. Select the group / user and click Add. About the OK button, the selection is finally adopted. |
Last change on 10.03.2014

