With this command you can enter all (scheduled) tasks of a client. To do so, merely enter one variable in the Details tab in which you want to save the tasks. Each attribute can be used with the following variables, where varname is the name of your variable:
This command works like a loop. Thus all commands which are subordinate to this command, will be executed once for each task, in which case the corresponding values of the current task are in the specified variable. |
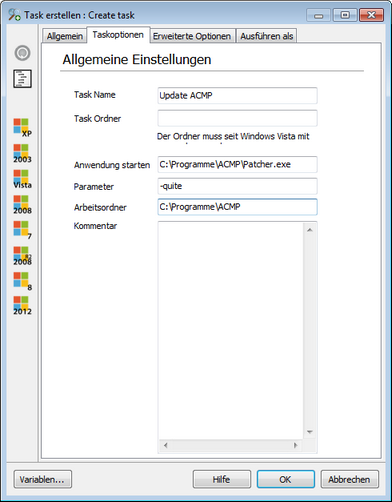
With this command you can set up a (scheduled) task on a client. Enter a task name in the task options. If the client uses Windows Vista (or a more current system) , you also have to specify the task folder. In addition, select the application that will perform the task. You can do this manually or with the Browse button. To do this, specify the appropriate parameters, which are to be transmitted to the application on startup. You also have to enter a suitable working directory - normally the same directory used by the application. The comment is optional.
In the Advanced options tab, you can adjust some of the more detailed features of the task:
Furthermore, the priority of the task can be specified. There are four priorities: Idle, Normal, High, and Real time.
In the Run tab you can specify a user as well as the matching password if the local client user does not have the necessary rights to execute the command. |
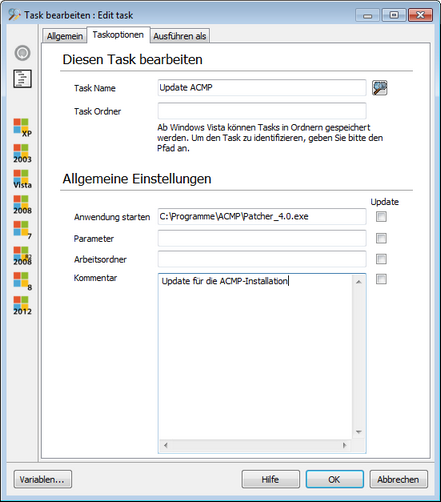
With this command you can change the information and the user of a task. In the Task options tab, you can change the same attributes as can be created in the Create Task. First select a task by manually entering the name or let the corresponding button display a list of all existing tasks of the local machine to choose from.
If the client uses Windows Vista (or a newer system), you can also change the task folder. In addition, you can re-select the application which you want run the task. You can do this manually or with the Browse button. In addition, you can adjust the parameters which are to be transmitted to the application on startup. Even the working directory may be modified if necessary.
In the Run tab you can specify a user as well as the matching password if the local client user does not have the necessary rights to execute the command.
If you want to fill out these fields and want to enable them for change, select the checkboxes next to the respective input fields. |
With this command you can delete a specific task. To do so, enter the task name in the Details tab. You ca do this manually or with the Browse button next to the input field, which lists all local tasks in a dialog. |
With this command, you will delete all tasks on a client. No other settings are available for this command. |
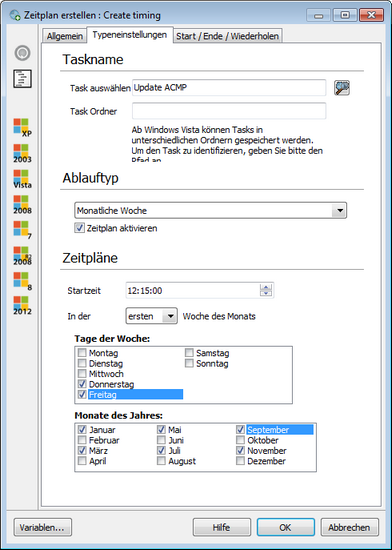
With this command you can create a schedule for the timing of a task. To do so, enter the task name of the task for which you want to create a time schedule in the Type settings tab. If you use Windows Vista (or higher system), also enter the task folder.
You can use the adjacent button to enter the task (task name), in which case a dialog with all locally available tasks will be displayed.
In the Schedule type section, you can enable the schedule - the task will then run according to this schedule - and specify the number of times the task should run. In the Schedules section, you can specify this information in more detail:
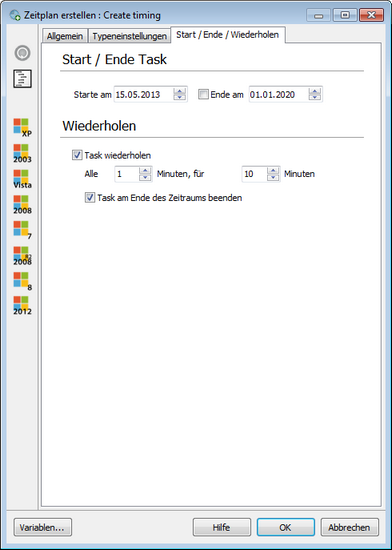
In the Start/End/Repeat tab, you can specify additionally a start data as well as an optional end date for this schedule. The end date you have to enable by checking the checkbox in front of the date.
In the Repeat section, you can have the task repeated at a specified interval for a certain period (every x minutes, for y minutes). Enable this feature by checking the boxes next to the option. The specification for y minutes refers subordinate function Terminate task at end of period. If you do not enable this function, the task will continue to run beyond the specified time frame. Otherwise, the task will be cancelled.
|
With this command you can delete all the existing schedules for a task. To do so, merely enter the task name - and if you use Windows Vista or a higher system - the task folder in the Details tab. |
Last change on 10.03.2014


