With this command you can read the product code of an (already installed) MSI package. This means that you can, e.g., compare an installed version with an installation file to be able to install the more recent version afterwards (with the help of additional commands). To do this, select in the Details tab either an MSI package file, which you can specify with the Browse button or select an installed or released package. This opens a dialog which lists all MSI packages known (scanned) to the ACMP. Select one of these packages. Then enter a variable into which the retrieved product code is to be stored (see Variables). |
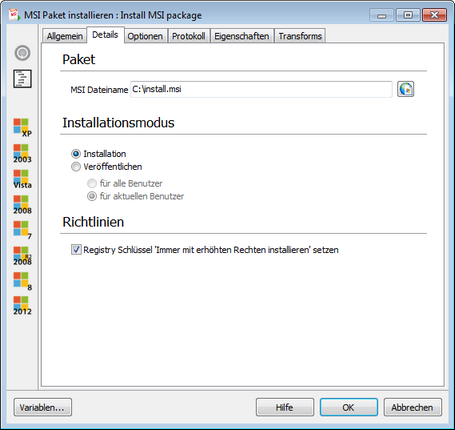
With this command you can launch a full MSI installation by specifying the file name of the package with the Browse button. In the installation mode, you can distinguish between a normal installation and a release, whereby in the case of a release you only have to decide if the release is to apply to all users or to the current user only. In the case of a release, the installation files are transferred, and a shortcut is created. The actual installation then takes place when the program is used for the first time.
WIth the Guidelines option you can request the necessary rights for the installation by setting a registry key.
Means to influence the installation are in the Options tab. In the Display section, the following four options are available:
In the Reboot, there are again three ways to control the installation:
As of ACMP 4.0, there is also the option of ignoring error codes that may pop up during installation by entering the corresponding error code in the text field. Each line corresponds to an error code. A table of possible error codes with their associated value is available here. This option is also available when uninstalling and repairing an MSI package.
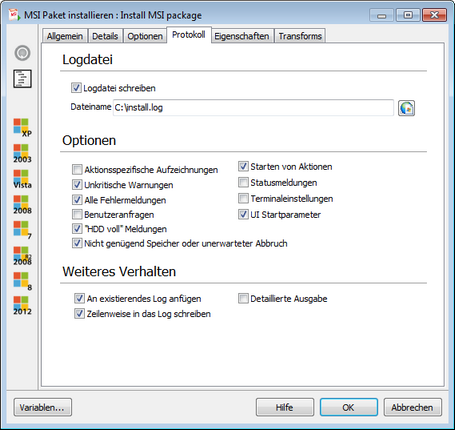
With the Log tab, the behavior of a log file can be controlled. If a log file is to be written during the installation, select the Write log file checkbox. Immediately below, you can then enter the path of the log file or insert it with the Browse button.
In the Log section, your can enable the following actions:
Furthermore, in the Additional behavior section, you can specify if the log texts are to be attached to an existing log, or if an existing log file is to be overwritten.
Likewise, the individual texts can be written line by line in the log, one after the other.
In addition to the short form of the log texts, it is also possible to select a detailed output containing more information. This option is well suited for debugging.
In the Properties tab, the properties of the selected MSI package can be viewed, modified and new features can be added. In the MSI package properties text box at the bottom, all available properties will be displayed.
If you select a property, it will be displayed in the Property name input field, while the property value will remain hidden. Only when you add this feature with the + button to the Custom properties, you will see this value as well. A selected property can be removed again by clicking the + button. If you want to assign a new value to a property, highlight the property and change the value. Accept the change by clicking on the adjacent button. Of course, you can also add your own property by entering a property name and a property value, and then clicking the + button.
In the Transforms tab you can attach *.mst files with the Browse button next to the File input field. These *.mst files (Microsoft Transform File) describe the arrangement of individual elements or user-specific settings of Microsoft products, provided that they support *.mst files.
A selected file can be added to the list with the +button and removed from the list with the - button. For an added file, you can change the path, by selecting the file in the list, changing it in the File input field and then updating the input with the appropriate button. |
With this command you can uninstall an MSI package by entering the product code of the required package in the Details tab. You can call a dialog with the button next to the input field to list all the MSI packages known (scanned) to the ACMP. You can also add an MSI package to the list, if it does not yet exist. In the display mode, there are four options for uninstalling:
WIth the Guidelines option you can request the necessary rights for deinstallation by setting a registry key. The Reboot option suppresses rebooting afater deinstallation and uses the REBOOT=ReallySuppress MSI option (see http://msdn.microsoft.com/en-us/library/aa371101(v=VS.85).aspx) to this end.
As with InstallShield MSI package and Repair MSI Product, you can ignore error codes when uninstalling. A list is available here. |
With this command you can repair an MSI installation. by entering the product code of the required package in the Details tab. You can call a dialog with the button next to the input field to list all the MSI packages known (scanned) to the ACMP. You can also add an MSI package to the list, if it does not yet exist. In the display mode, there are four options for executing repairs:
WIth the Guidelines option you can request the necessary rights for the repairs by setting a registry key.
Under the Options tab further information on the actual repair can be made. In the Files section, you can determine that the package must be newly installed if files are missing, or if a selected option is valid, or if you want to enforce reinstallation of all files. Moreover, there is also the option to ignore certain error codes.
In the Settings section, you can select if custom and computer-specific registry entries as well as existing links should be reinstalled. It is also possible to start the repair process from one source, in which case all current files will be replaced by the original files.
With the Log tab, the behavior of a log file can be controlled. If a log file is to be written during the installation, select the Write log file checkbox. Immediately below, you can then enter the path of the log file or insert it with the Browse button. In the Options section, your can enable the following actions:
Furthermore, in the Additional behavior section, you can specify if the log texts are to be attached to an existing log, or if an existing log file is to be overwritten. Likewise, the individual texts can be written line by line in the log, one after the other. In addition to the short form of the log texts, it is also possible to select a detailed output containing more information. |
With this command you can distribute updates for MSI installations by specifying the patch file with the Browse button. In the installation type, a default patch process or a patch operation via a network image to be specified can be selected.
Means to influence the installation are in the Options tab. In the Display section, the following four options are available:
In the Reboot, there are again three ways to control the installation:
With the Log tab, the behavior of a log file can be controlled. If a log file is to be written during the installation, select the Write log file checkbox. Immediately below, you can then enter the path of the log file or insert it with the Browse button.
In the Options section, your can enable the following actions:
Furthermore, in the Additional behavior section, you can specify if the log texts are to be attached to an existing log, or if an existing log file is to be overwritten. Likewise, the individual texts can be written line by line in the log, one after the other. In addition to the short form of the log texts, it is also possible to select a detailed output containing more information. This option is well suited for debugging.
In the Properties tab, the properties of the selected MSI package can be viewed, modified and new features can be added. In the MSI package properties text box at the bottom, all available properties will be displayed. If you select a property, it will be displayed in the Property name input field, while the property value will remain hidden. Only when you add this feature with the + button to the Custom properties, you will see this value as well. A selected property can be removed again by clicking the - button. If you want to assign a new value to a property, highlight the property and change the value. Accept the change by clicking on the adjacent button. Of course, you can also add your own property by entering a property name and a property value, and then clicking the + button.
In the Transforms tab you can attache *.mst files with the Browse button next to the File input field. These *.mst files (Microsoft Transform File) describe the arrangement of individual elements or user-specific settings of Microsoft products, provided that they support *.mst files. A selected file can be added to the list with the +button and removed from the list with the - button. For an added file, you can change the path, by selecting the file in the list, changing it in the File input field and then updating the input with the appropriate button. |
With this command you can reconfigure an MSI installation by entering the product code of the required package in the Details tab. You can call a dialog with the button next to the input field to list all the MSI packages known (scanned) to the ACMP. You can also add an MSI package to the list, if it does not yet exist. In the Display section, there are four options for reconfiguration:
WIth the Guidelines option you can request the necessary rights for reconfiguration by setting a registry key.
In Options tab, you can now newly define the installation scope and afterwards enter the current installation status of the installation, e.g., if the product is locally installed. |
Last change on 10.03.2014

