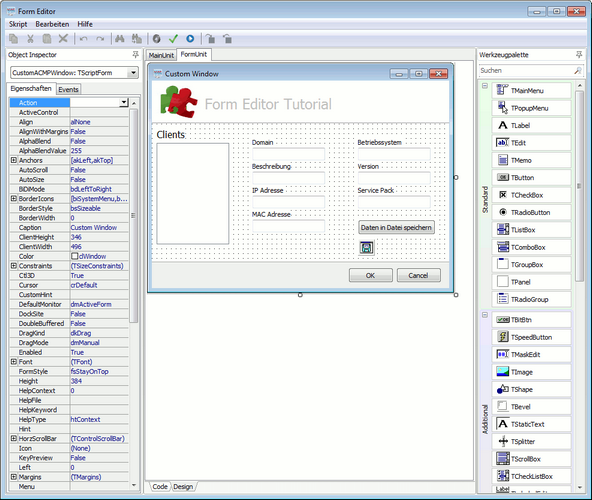
The data of the currently selected client will now be displayed. The feature of the form will now be extended to include the option to store the data of a client in a file. To do so, place a button on the form and assign, e.g. the caption (heading) Save data in file to it with the Object Inspector. Then create a new function by double clicking in the empty box next to the Run event OnClick via the Events tab.

Complete the form
Since the user is to have later the option of saving the displayed data in any file, a corresponding (default) dialog is required, which permits a file selection. To generate this dialog, change from the source code to the form tab and place the components SaveDialog from the toolbox (under dialogs) on the form. You can use the Object Inspector as the DefaultExt (file extension) to .txt and move the filter on text file (*.txt) | *.txt. However, this component is not visible when the form is executed.
Now switch back to the source code view in the Button1Click feature. There you declare the TStringList variables data. A confirmation dialog will be installed, which checks whether any one client in the ListBox is selected. If this is not the case, Save is canceled via Exit.
The Save dialog is now assigned a file name. To this end, read the selected Clientname from the ListBox, as is already done in the function FormActivate. Then the SaveDialog is executed by means of an if-query. This opens the standard dialog to save a file. The Clientname previously assigned appears as a suggestion for the file name. If the dialog is canceled, an information dialog is displayed stating that data could not be saved.
If the dialog is confirmed, the variable data are first initialized and filled via the add() function with the data from the Edit fields as well as the client name from the ListBox in a try/finally block. Then the SaveToFile method is activated, so that the file content is saved in the selected file. SaveDialog1.FileName includes the selected file name.
After saving the resources of the variable data are released. The form is now ready and has the required functions.
Procedure Button1Click(Sender: TObject);
var
data : TStringList;
begin
if ListBox1.ItemIndex < 0 then
exit;
SaveDialog1.FileName := ListBox1.items.strings[ListBox1.ItemIndex] + '.txt';
if SaveDialog1.Execute(null) then
begin
try
data := TStringList.Create();
data.Add('Client = ' + ListBox1.items.strings[ListBox1.ItemIndex]);
data.Add('Domain = ' + EditDomain.Text);
data.Add('Description = ' + EditDescription.Text);
data.Add('IP Adresse = ' + EditIP.Text);
data.Add('MAC Address = ' + EditMAC.Text);
data.Add('Operating system = ' + EditOS.Text);
data.Add('Version = ' + EditVersion.Text);
data.Add('ServicePack = ' + EditSP.Text);
data.SaveToFile(SaveDialog1.FileName);
finally
data.Free;
ShowMessage('Data were saved in: ' + SaveDialog1.FileName);
end;
end;
else
ShowMessage('Save interrupted.');
end;
Last change on 10.03.2014